In this codelab we will show you how to build and install the Matter Controller on a Raspberry Pi.
What You'll Build
In this codelab, you will:
- Build the chip-tool as a Matter controller on a Raspberry Pi.
- Learn about the concept of Matter Fabrics
Architecture
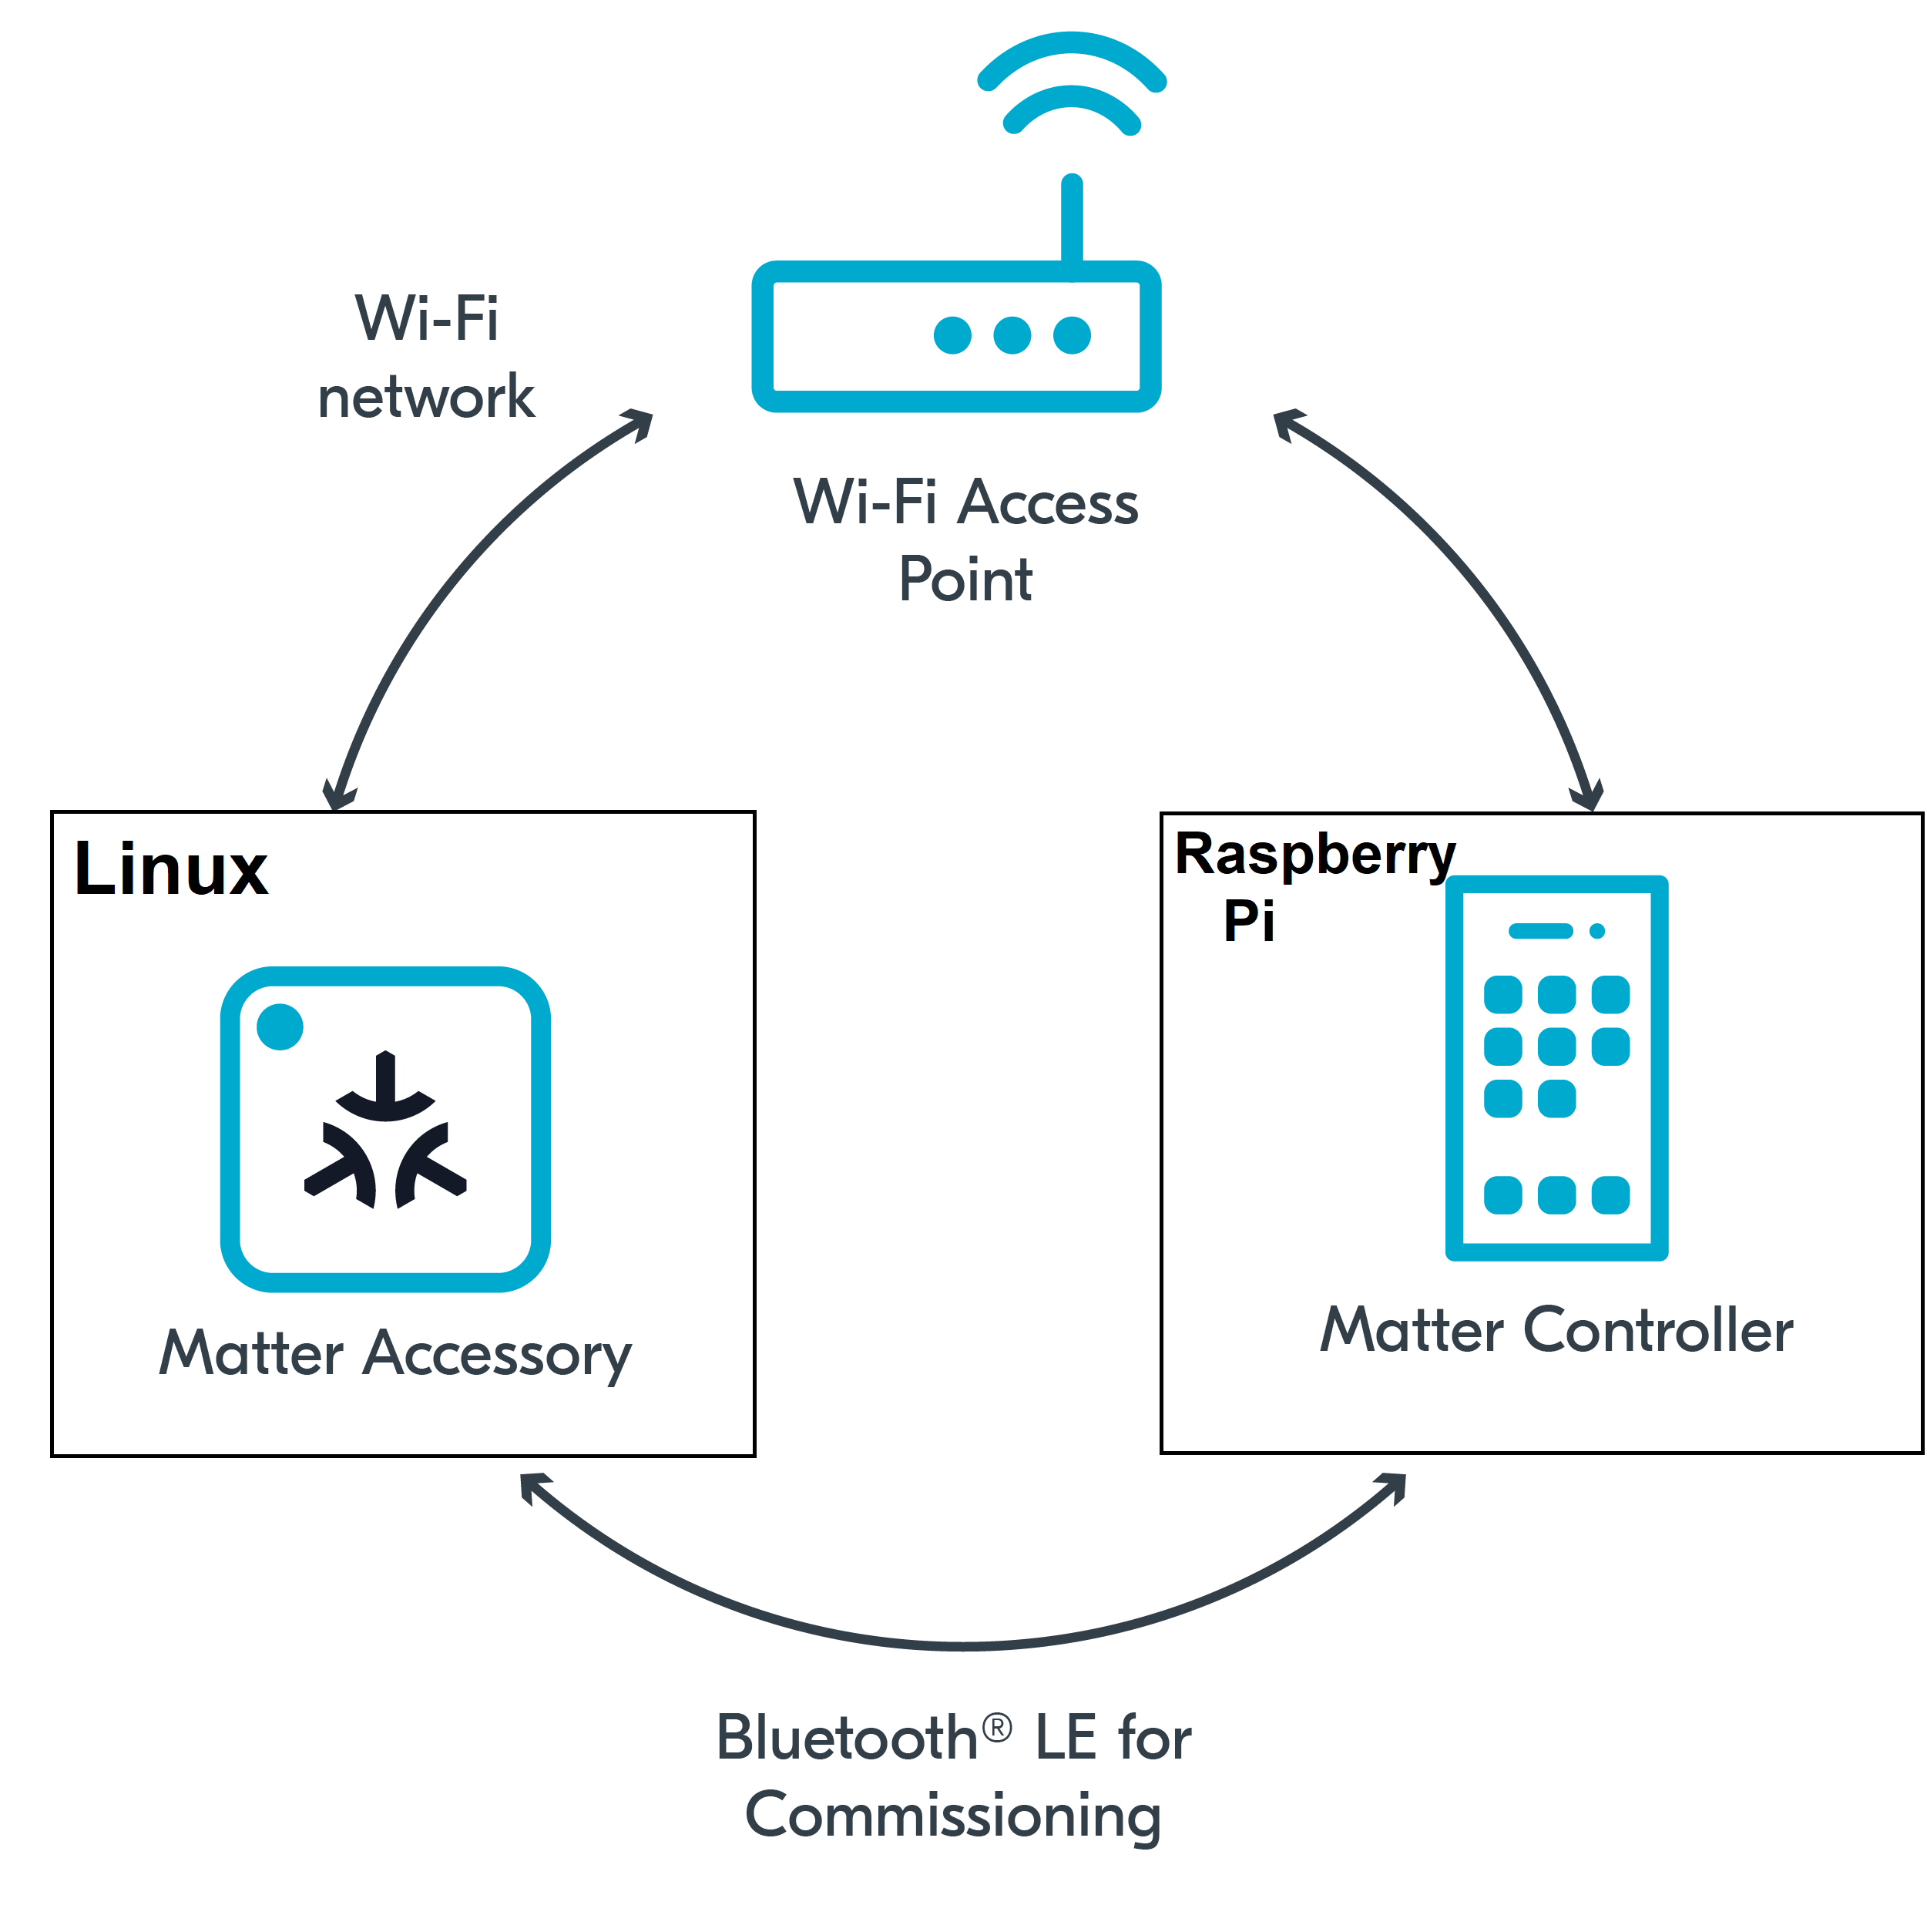
in this CodeLab we will build the Matter Controller on a Raspberry Pi and we use this to controller a Matter Accessory that we set up previously on our Linux Host. This will allow us to create a multi admin Matter Network and we will learn how Matter fabrics work.
What You'll Learn
- What you will need (Pre-requisities)
- How to set up a headless Raspberry Pi
- What prerequisites are required for the Raspberry Pi
- How to build the matter controller on the Raspberry Pi
- What is a Matter fabric and how to control a sample app using the chip-tool
This set of Codelabs will use Ubuntu 22.04 on a Amd64 based architecture. If you are using Mac OS then you should follow the instructions directly from the Matter repo
You will need
- a Raspberry Pi 4 (or Raspberry Pi 3)
- a SD card at least 16GB to install Ubuntu 22.04 OS
- a laptop or PC running
Windows,MacOSorUbuntu 22.04 - Visual Studio Code IDE
- a basic knowledge of Linux shell commands
The total codelab will take approximately a Duration of 30 minuates to complete.
We will be using the RPImager tool which is available on the Raspberry Pi Software Page
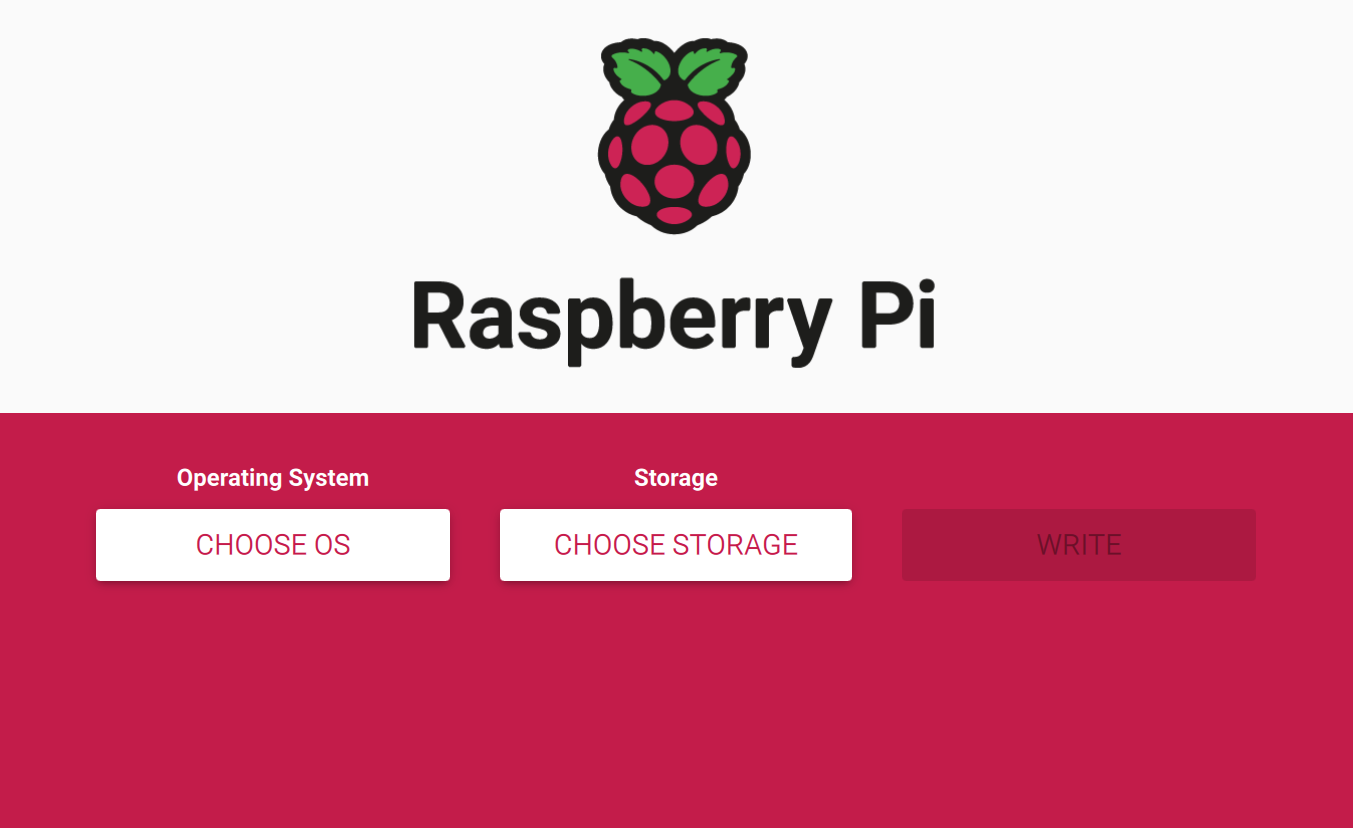
- First thing we will do is insert your SD card into the SD card reader on your laptop
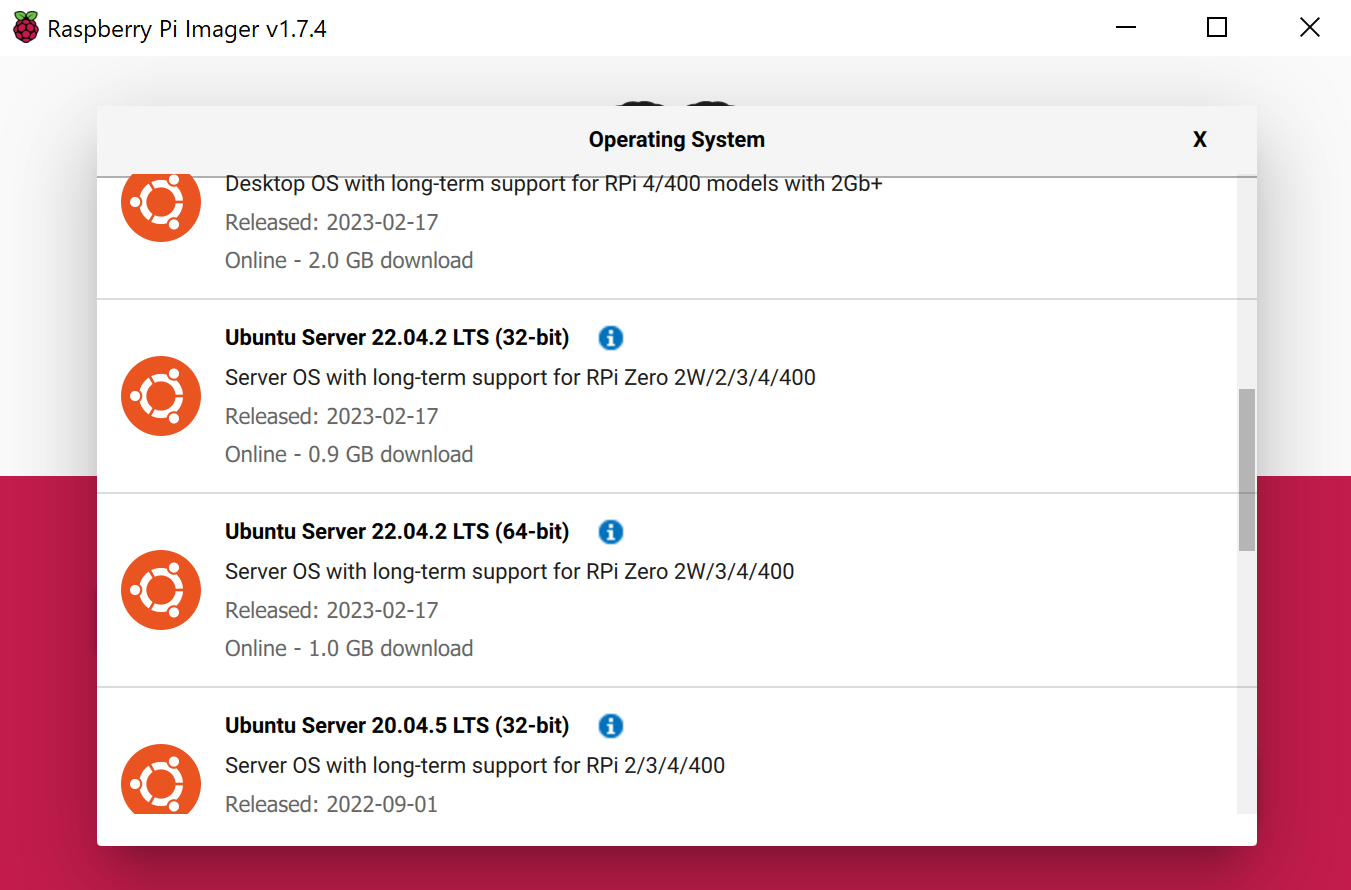
- Next we will do is select the Ubuntu OS version 22.04 64bit (server edition)
- Then select the
settings cogto open the advanced settings
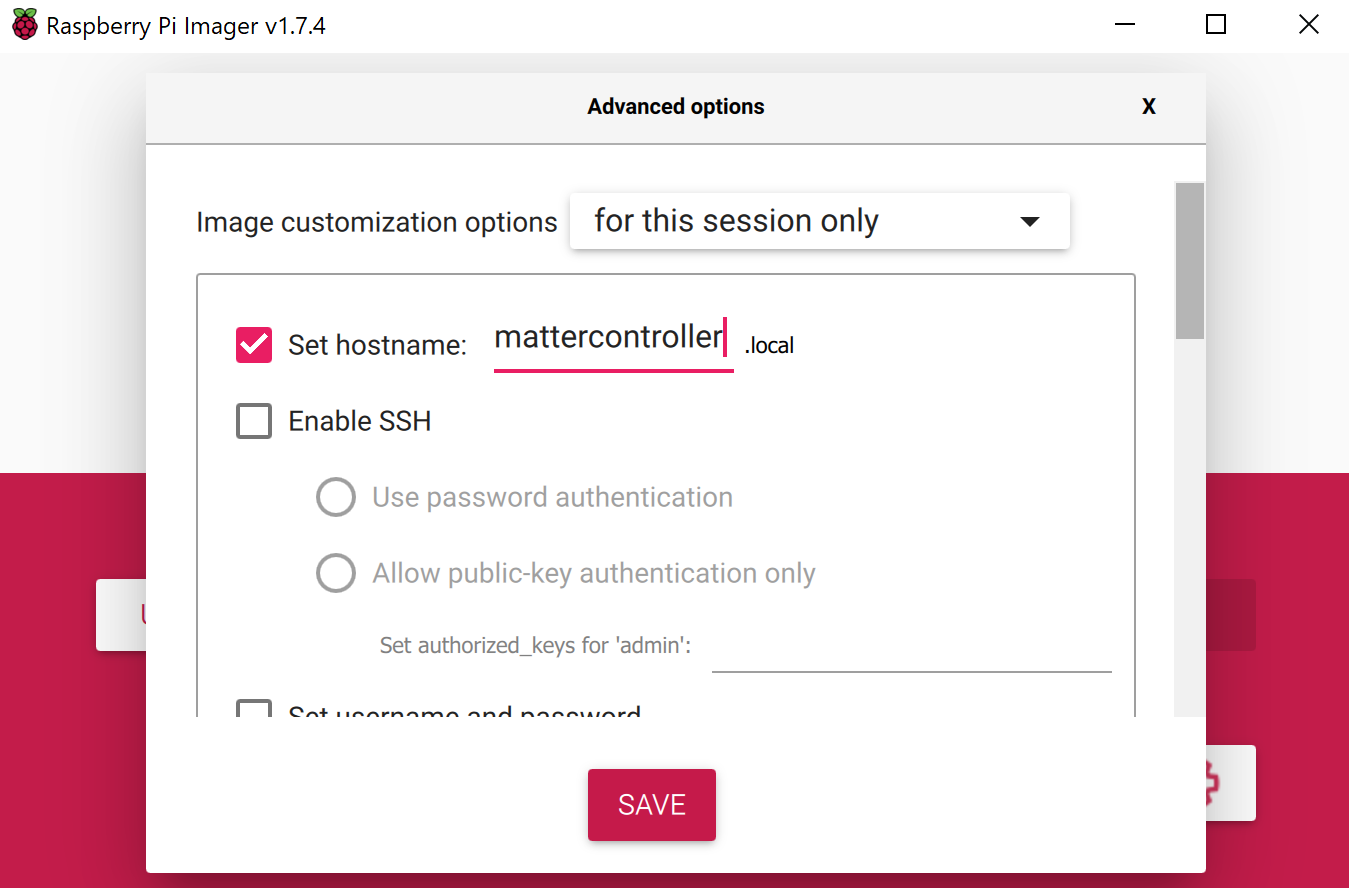
You can use whatever settings to meet your requirements, however, you will need to remember the hostname so please write this down and make sure its unique on your network.
Also, in future codelabs we will be making us of the user account that you create so I recommend that you set
- the hostane name to
mattercontroller.local - the account name to
ggc_user.
You can use whatever password matches your security needs.
Enter your wifi network credentials. These should be for the same wifi network that you Linux host that you set up in a previous codelab that is running the Matter Sample app.
- Flash the SD card, Insert and Power up
After the SD card has been written, transfer it to your Raspberry Pi and power up your Pi
- Try to discover and log into your RPi
You should be able to discover your RPi using its hostname
ssh ggc_user@mattercontroller.local
If, like me, you are using Windows Subsystem for Linux or for some reason your router is blocking mDNS broadcast you can find the IP address of your RPi using nmap on your local network ip subnet sudo nmap -p 22 192.168.0.0/24
ssh ggc_user@IPADDRESSHERE
- Always good practice to upgrade to latest release:
sudo apt-get update
sudo apt-get upgrade
If you are using a Raspberry Pi 3 (RPI 4s are hard to come by!) then you may want to add some swap space as the code compilation required to build the matter library may push the RPI3 to its limits. The RPI 3 is limited in RAM space so having some Swap space may help prevent the dreaded hanging!
- Create Swap file
sudo fallocate -l 500M /swapfile1
- Verify Swap file allocated space
ls -lh /swapfile1
- Change Swap file permission
sudo chmod 600 /swapfile1
- Mark swapfile1 as swap space
sudo mkswap /swapfile1
- Enable Swap file
sudo swapon /swapfile1
- Check swap file availability
sudo swapon --show
free -h
- Make Swap file permanent
sudo cp /etc/fstab /etc/fstab.bak
echo '/swapfile1 none swap sw 0 0' | sudo tee -a /etc/fstab
The official matter github repo is the ConnectedHomeIP repo from Project Chip
- First thing we will do is create a new folder so that we can clone the code
mkdir ~/Projects
cd ~/Projects
- Next we will clone the github repo
git clone https://github.com/project-chip/connectedhomeip.git
cd connectedhomeip
#git checkout tags/v1.1.0.1 #We try to keep to main tags (see releases)
- Matter relies on a substantial number of submodules. So next we will synchronize these submodules
./scripts/checkout_submodules.py --allow-changing-global-git-config --shallow --platform linux
Note: this process can take a while the very 1st time you install matter.
Before building our Matter controller and sample app, we need to install a few OS specific dependencies.
- Since we are using Ubuntu 22.04, the following dependencies are needed:
sudo apt-get install git gcc g++ pkg-config libssl-dev libdbus-1-dev \
     libglib2.0-dev libavahi-client-dev ninja-build python3-venv python3-dev \
     python3-pip unzip libgirepository1.0-dev libcairo2-dev libreadline-dev
Note: this process can take a while the very 1st time when you install matter.
- Additionally for the Raspberry Pi, the following dependencies are needed:
sudo apt-get install pi-bluetooth avahi-utils
- Do a little clean up to save disk space.
sudo apt-get clean
Configuring wpa_supplicant for storing permanent changes
By default, wpa_supplicant is not allowed to update (overwrite) configuration. If you want the Matter application to be able to store the configuration changes permanently, you need to make the following changes:
Edit the dbus-fi.w1.wpa_supplicant1.service file to use configuration file instead by running the following command:
sudo nano /etc/systemd/system/dbus-fi.w1.wpa_supplicant1.service
Run the following command to change the wpa_supplicant start parameters to the provided values:
ExecStart=/sbin/wpa_supplicant -u -s -i wlan0 -c /etc/wpa_supplicant/wpa_supplicant.conf
Add the wpa-supplicant configuration file by running the following command:
sudo nano /etc/wpa_supplicant/wpa_supplicant.conf
Add the following content to the wpa-supplicant file:
ctrl_interface=DIR=/run/wpa_supplicant
update_config=1
Finally, reboot your Raspberry Pi and log back in again.
Before building any matter app or controller we will need to create and initialise the environment
Run the following commands
cd ~/Projects/connectedhomeip
source scripts/activate.sh
If everything has gone ok with the environment setup you should see:
Checking the environment:

20250506 13:25:40 INF Environment passes all checks!

Environment looks good, you are ready to go!
- We then need to build the chip tool (and all clsuters app) using the build examples script. Run the following commands
scripts/build/build_examples.py --target linux-arm64-chip-tool-ipv6only-platform-mdns --target linux-arm64-all-clusters-ipv6only gen

cd out/linux-arm64-chip-tool-ipv6only-platform-mdns

ninja --j 1

cd ../linux-arm64-all-clusters-ipv6only

ninja --j 1
Note: if using a Raspberry Pi 3 you can use the flag -j 1 in the ninja command to limit multi tasking the build across multiple cores. This can help prevent hangs. Also note: I recommend you run each build in the background and disown so that if you're ssh times out the compilation process wont quit (Ctrl-z => bg => disown)
- We then move the Matter Controller (chip-tool) to the
outdirectory using the following commands
mv out/linux-arm64-chip-tool-ipv6only-platform-mdns/chip-tool out/chip-tool \
&& rm -rf out/linux-arm64-chip-tool-ipv6only-platform-mdns
mv out/linux-arm64-all-clusters-ipv6only/chip-all-clusters-app out/chip-all-clusters-app \
&& rm -rf out/linux-arm64-all-clusters-ipv6only
- If everything worked OK you should see an executable called
chip-toolin theout/directory
cd out/
ls -al
Note: if you run the chip-tool ensure that you clean up some of the temporary files using rm -rf /tmp/chip* as its a good habit to remove these after every time you test.
In this section we will run a sample matter accessory application (all-clusters-app) and control with an administrative tool called the chip-tool that acts as a matter controller.
Running the CHIP all clusters aoo
Firstly we will run the chip-all-clusters-app. Execute the following command in the connectedhomeip directory:
./out/chip-all-clusters-app
As a result, the CHIP all clusters app will start advertising on the local IP network and will wait for commissioning with pin code 20202021.
Running the CHIP Tool
Firstly we will check if the CHIP Tool runs correctly. Execute the following command in the connectedhomeip directory:
./out/chip-tool
As a result, the CHIP Tool will print all available commands. These are called clusters in this context, but not all listed commands correspond to the clusters in the Data Model (for example, pairing or discover commands).
Using the CHIP Tool
- Clean the initialization of state using the following command:
rm -fr /tmp/chip_*
Note: removing the /tmp/chip* files can sometimes clear up unexpected behaviours.
- In the same shell window, try to commission the matter accessory using the the CHIP Tool. Commissioning is what we call the process of bringing a Matter Node into a Matter Fabric. We will explain all of these terms in a further codelab. Essentially, we are creating a secure relationship between the Matter Controller (chip-tool) and the Matter Accessory (chip-all-clusters-app).
./out/chip-tool pairing onnetwork ${NODE_ID_TO_ASSIGN} 20202021
If everything is working you should see output logs and you should see that the commissioning was successful
[1683309736.149316][15:17] CHIP:CTL: Successfully finished commissioning step 'Cleanup'
[1683309736.149405][15:17] CHIP:TOO: Device commissioning completed with success
- Now that we have created a secure relationship by "commissioning" the matter accessory we will now do some simple interaction with the Matter Accessory using the chip-tool as a Matter controller. We will get into further details of the "interaction model" and "data model" of Matter in later codelabs. But for now, we will do some simple interactions/
In the same shell window, we will read the vendor-name of the Matter accessory using the following command:
./out/chip-tool basicinformation read vendor-name 1 0
In the output logs, you should see that the Vendor Name
[1682445848.220725][5128:5130] CHIP:TOO: VendorName: TEST_VENDOR
- We can read other information using these commands:
./out/chip-tool basicinformation read product-name 1 0
./out/chip-tool basicinformation read software-version 1 0
We are using the Basic Information cluster. Clusters are logical groupings of Matter functionality.
- We can read other information from another using these commands:
./out/chip-tool generaldiagnostics read up-time 1 0
In the output logs, you should see the UpTime
[1682446010.495854][5286:5288] CHIP:TOO: UpTime: 1008
- You can find out the other different clusters that are supported by the chip-tool by running:
./out/chip-tool
Cleaning Up
You should stop the chip-all-clusters-app process by using Ctrl-C in the first shell window.
It also a great habit to clean up the temporary files after you finish testing by using this command:
rm -fr /tmp/chip_*
Note: removing the /tmp/chip* files can sometimes clear up unexpected behaviours.
If you want to use the Raspberry Pi to commission external Matter accessories and these Matter accessories expect to use Bluetooth Low Energy to start the commissioning then you may run into some errors as there is a known bug when a Raspberry Pi 3 & 4 is using both Wifi and Eth0 adapters. Apparently they share the same chipset. I have not tested on a Raspberry Pi 5 so this problem may have been resolved.
3.1. Troubleshooting issues
Make sure you are able to see a bluetooth device using;
hcitool dev
Note: if you are having problems finding a bluetooth device. Then you can try this:
sudo apt-get dist-upgrade -y
sudo apt-get install pi-bluetooth
There is also a known bug when a Raspberry Pi is using both Wifi and Eth0 adapters. Bring the Wifo adapter down using this command:
sudo ip link set dev wlan0 down
Checkout the official documentation here: Project Chip - ConnectedHomeIp