In this codelab we will show you how to build and install a Matter controller and sample app on a Linux based OS.
What You'll Build
In this codelab, you will:
- Build a sample Matter Application that supports much of the standard matter capabilities (clusters) of a Matter Accessory
- Build a management tool that will act as a Matter controller.
Architecture
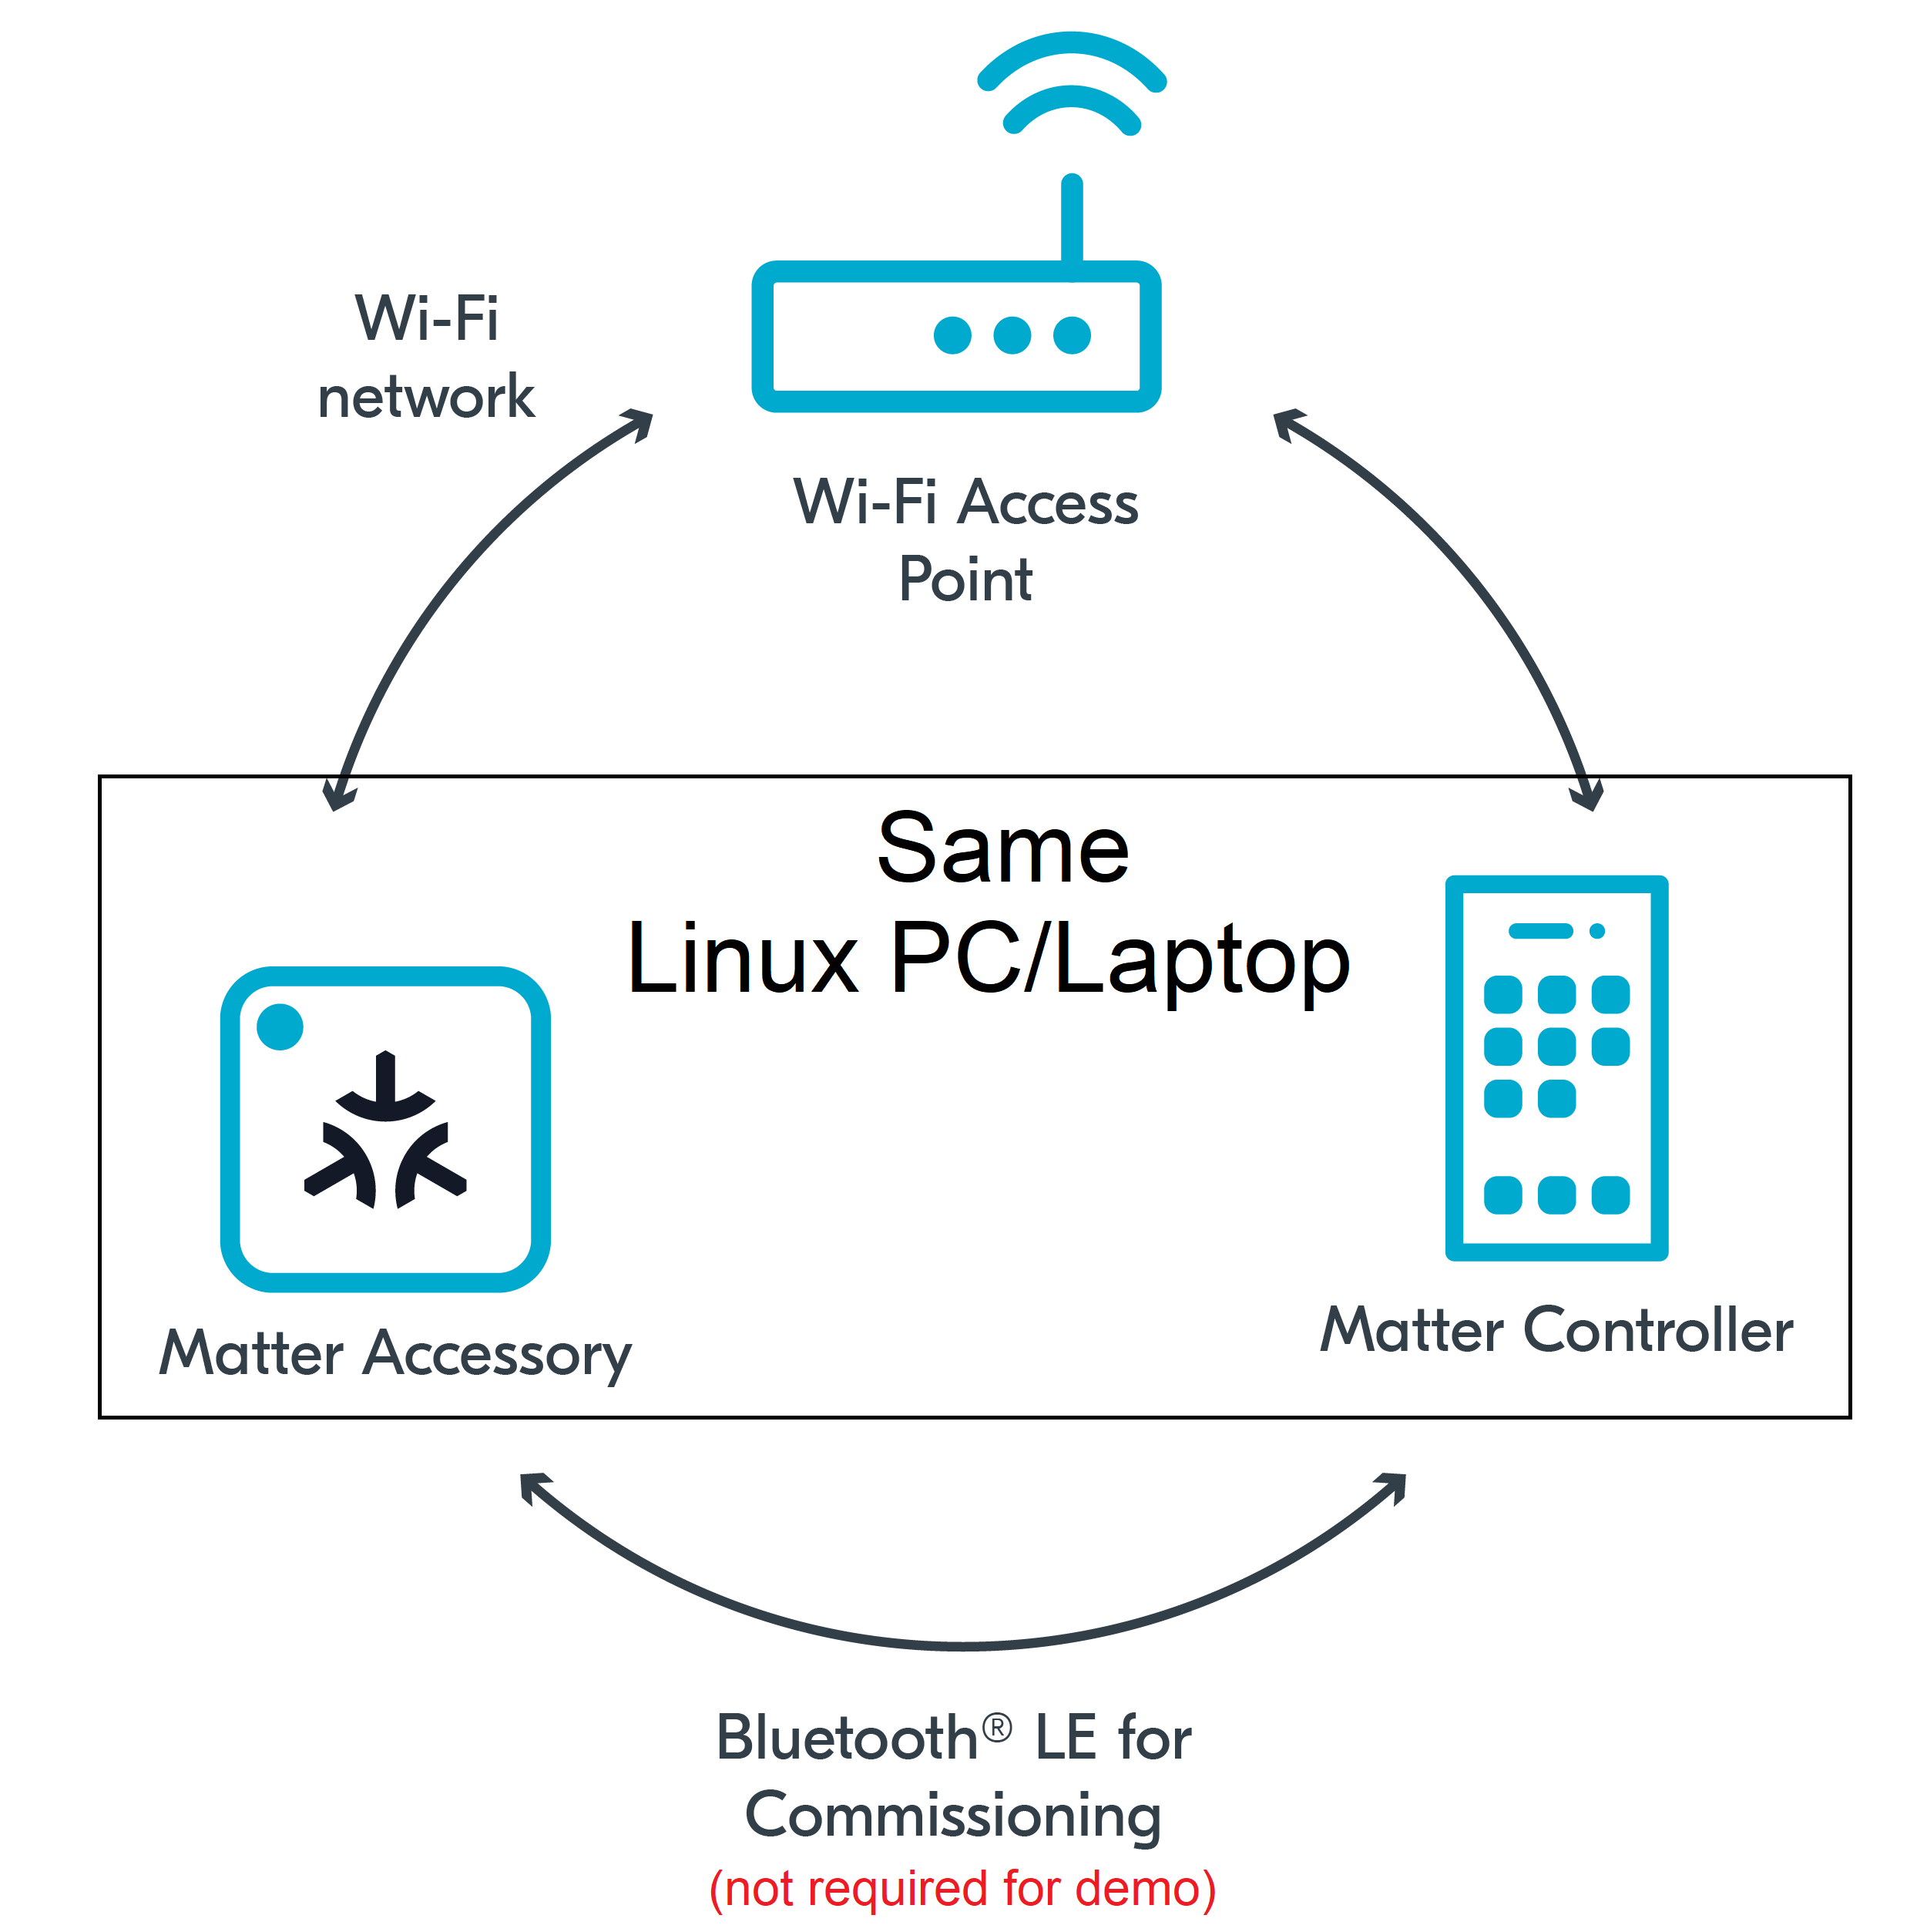
Typically, a Matter Accessory will be added to the same Wifi or Thread network as the Matter Controller as part of the "commissioning" process over Bluetooth Low Energy (BLE). However, in this CodeLab we will run the Matter Accessory and the Matter Controller on the same Linux Host. This will allow us to create a simple Matter Network very quickly. In further codelabs, we will learn how to commission Matter devices over BLE.
What You'll Learn
- What you will need (Pre-requisities)
- Where to get the latest version of Matter
- How to build a sample matter app and the matter controller (chip-tool)
- Basic testing with sample app and chip-tool
This set of Codelabs will use Ubuntu 22.04 on a Amd64 based architecture. If you are using Mac OS then you should follow the instructions directly from the Matter repo
You will need
- a laptop or PC running
Ubuntu 22.04with a Bluetooth interface - Visual Studio Code IDE
- a basic knowledge of Linux shell commands
The total codelab will take approximately a Duration of 30 minuates to complete.
The official matter github repo is the ConnectedHomeIP repo from Project Chip
- First thing we will do is create a new folder so that we can clone the code
mkdir ~/Projects
cd ~/Projects
- Next we will clone the github repo
git clone https://github.com/project-chip/connectedhomeip.git
cd connectedhomeip
#git checkout XXXXXXXX #use if you want to check out a particular commit hash
- Matter relies on a substantial number of submodules. So next we will synchronize these submodules
./scripts/checkout_submodules.py --allow-changing-global-git-config --shallow --platform linux
Note: this process can take a while the very 1st time you install matter.
Before building our Matter controller and sample app, we need to install a few OS specific dependencies.
- If using Ubuntu 22.04, the following dependencies are needed:
sudo apt-get install git gcc g++ pkg-config libssl-dev libdbus-1-dev \
     libglib2.0-dev libavahi-client-dev ninja-build python3-venv python3-dev \
     python3-pip unzip libgirepository1.0-dev libcairo2-dev libreadline-dev
Note: this process can take a while the very 1st time when you install matter.
In this section we will build a sample matter app that we can use for testing and experimenting. We will use the Linux all-clusters-app which has all the main capabilities of a matter end device.
We will also build the matter controller tool that is provided by Project-Chip. The chip-tool is an example application that uses Matter to send messages to a Matter server. It is very useful for experimenting with Matter devices and can help us understand how Matter works.
- Before building any matter app or controller we will need to create and initialise the environment
Run the following commands
cd ~/Projects/connectedhomeip
source scripts/bootstrap.sh
source scripts/activate.sh
If everything has gone ok with the environment setup you should see:
Checking the environment:

20250423 16:49:39 INF Environment passes all checks!

Environment looks good, you are ready to go!
- We then need to build the underlying core chip libraries
Run the following commands
gn gen out/debug --args='chip_mdns="platform" chip_inet_config_enable_ipv4=false'
ninja -C out/debug
- We then can build the required sample apps using the following commands
./scripts/build/build_examples.py \
  --target linux-x64-all-clusters-ipv6only \
  --target linux-x64-chip-tool-ipv6only \
  build \
  && mv out/linux-x64-all-clusters-ipv6only/chip-all-clusters-app out/chip-all-clusters-app \
  && mv out/linux-x64-chip-tool-ipv6only/chip-tool out/chip-tool
- If everything worked OK you should see an executable called
chip-all-clusters-appandchip-toolin theout/directory
cd out/
ls -al
Note: if you run the chip-all-clusters-app ensure that you clean up some of the temporary files using rm -rf /tmp/chip* as its a good habit to remove these after every time you test.
In this section we will run a sample matter accessory application (all-clusters-app) and control with an administrative tool called the chip-tool that acts as a matter controller.
Running the CHIP Tool
Firstly we will check if the CHIP Tool runs correctly. Execute the following command in the connectedhomeip directory:
./out/chip-tool
As a result, the CHIP Tool will print all available commands. These are called clusters in this context, but not all listed commands correspond to the clusters in the Data Model (for example, pairing or discover commands).
Using the CHIP Tool
- Clean the initialization of state using the following command:
rm -fr /tmp/chip_*
Note: removing the /tmp/chip* files can sometimes clear up unexpected behaviours.
- In a shell window, start the Matter accessory device:
./out/chip-all-clusters-app
You should see output logs and you should pay close attention to the details containing the device information
[1682444491.725740][4142:4142] CHIP:DL: Device Configuration:
[1682444491.725840][4142:4142] CHIP:DL:   Serial Number: TEST_SN
[1682444491.725885][4142:4142] CHIP:DL:   Vendor Id: 65521 (0xFFF1)
[1682444491.725901][4142:4142] CHIP:DL:   Product Id: 32769 (0x8001)
[1682444491.725909][4142:4142] CHIP:DL:   Product Name: TEST_PRODUCT
[1682444491.725923][4142:4142] CHIP:DL:   Hardware Version: 0
[1682444491.725931][4142:4142] CHIP:DL:   Setup Pin Code (0 for UNKNOWN/ERROR): 20202021
[1682444491.725940][4142:4142] CHIP:DL:   Setup Discriminator (0xFFFF for UNKNOWN/ERROR): 3840 (0xF00)
[1682444491.725953][4142:4142] CHIP:DL:   Manufacturing Date: (not set)
[1682444491.725960][4142:4142] CHIP:DL:   Device Type: 65535 (0xFFFF)
[1682444491.725979][4142:4142] CHIP:SVR: SetupQRCode: [MT:-24J042C00KA0648G00]
[1682444491.725992][4142:4142] CHIP:SVR: Copy/paste the below URL in a browser to see the QR Code:
[1682444491.726000][4142:4142] CHIP:SVR: https://project-chip.github.io/connectedhomeip/qrcode.html?data=MT%3A-24J042C00KA0648G00
[1682444491.730420][4142:4142] CHIP:SVR: Manual pairing code: [34970112332]
- In a second shell window, try to discover the matter accessory using the the CHIP Tool:
./out/chip-tool discover commissionables
If everything is working you should see output logs and you should see the device information above is successfully discovered by the matter controller
[1682445006.638403][4913:4915] CHIP:DIS: Discovered node:
[1682445006.638461][4913:4915] CHIP:DIS:        Hostname: 2A78BBC523530000
[1682445006.638470][4913:4915] CHIP:DIS:        IP Address #1: fe80::215:5dff:feb1:bd80
[1682445006.638474][4913:4915] CHIP:DIS:        Port: 5540
[1682445006.638507][4913:4915] CHIP:DIS:        Mrp Interval idle: not present
[1682445006.638516][4913:4915] CHIP:DIS:        Mrp Interval active: not present
[1682445006.638523][4913:4915] CHIP:DIS:        TCP Supported: 1
[1682445006.638530][4913:4915] CHIP:DIS:        Vendor ID: 65521
[1682445006.638568][4913:4915] CHIP:DIS:        Product ID: 32769
[1682445006.638576][4913:4915] CHIP:DIS:        Device Type: 65535
[1682445006.638610][4913:4915] CHIP:DIS:        Long Discriminator: 3840
[1682445006.638618][4913:4915] CHIP:DIS:        Pairing Hint: 33
[1682445006.638625][4913:4915] CHIP:DIS:        Instance Name: F7C553DE411295F0
[1682445006.638663][4913:4915] CHIP:DIS:        Commissioning Mode: 1
[1682445006.638950][4913:4913] CHIP:CTL: Shutting down the commissioner
- In the same shell window, try to commission the matter accessory using the the CHIP Tool. Commissioning is what we call the process of bringing a Matter Node into a Matter Fabric. We will explain all of these terms in a further codelab. Essentially, we are creating a secure relationship between the Matter Controller (chip-tool) and the Matter Accessory (chip-all-clusters-app).
./out/chip-tool pairing onnetwork-long 1 20202021 3840
If everything is working you should see output logs and you should see that the commissioning was successful
[1682445590.030746][4983:4985] CHIP:CTL: Successfully finished commissioning step 'Cleanup'
[1682445590.030773][4983:4985] CHIP:TOO: Device commissioning completed with success
- Now that we have created a secure relationship by "commissioning" the matter accessory we will now do some simple interaction with the Matter Accessory using the chip-tool as a Matter controller. We will get into further details of the "interaction model" and "data model" of Matter in later codelabs. But for now, we will do some simple interactions/
In the same shell window, we will read the vendor-name of the Matter accessory using the following command:
./out/chip-tool basicinformation read vendor-name 1 0
In the output logs, you should see the Vendor Name
[1682445848.220725][5128:5130] CHIP:TOO: VendorName: TEST_VENDOR
- We can read other information using these commands:
./out/chip-tool basicinformation read product-name 1 0
./out/chip-tool basicinformation read software-version 1 0
We are using the Basic Information cluster. Clusters are logical groupings of Matter functionality.
- We can read other information from another using these commands:
./out/chip-tool generaldiagnostics read up-time 1 0
In the output logs, you should see the UpTime
[1682446010.495854][5286:5288] CHIP:TOO: UpTime: 1008
- You can find out the other different clusters that are supported by the chip-tool by running:
./out/chip-tool
Cleaning Up
You should stop the chip-all-clusters-app process by using Ctrl-C in the first shell window.
It also a great habit to clean up the temporary files after you finish testing by using this command:
rm -fr /tmp/chip_*
Note: removing the /tmp/chip* files can sometimes clear up unexpected behaviours.
Checkout the official documentation here: Project Chip - ConnectedHomeIp